今夜月明人尽望,不知秋思落谁家。—— 王建《十五夜望月寄杜郎中》
首先,祝掘友们中秋快乐,团团圆圆!
由于本人刚开始学Compose(惭愧),这也是第一次尝试用Compose写自定义控件,算是以掘金的中秋活动作为契机,给大家整个小乐子吧。
接下来就是硬讲时间了。如果以下有做法不对的地方,欢迎大家留言告知一下,感谢!
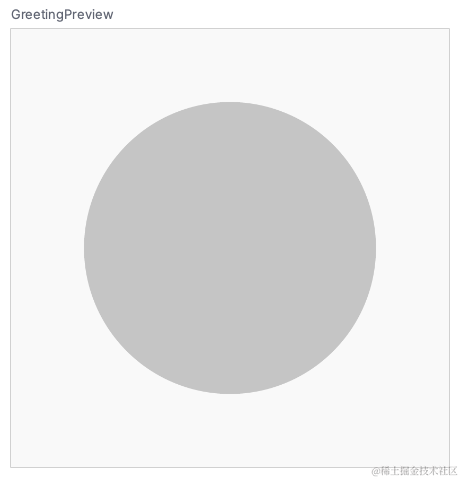
第一步:画圆
这是我第一次接触Canvas,但好像又不是第一次。因为它和View中的Canvas用法实在太像了。
1
2
3
4
5
6
7
8
| @Composable
fun Moon(modifier: Modifier = Modifier) {
Canvas(modifier = modifier) {
val cx = size.width / 2
val cy = size.height / 2
val radius = size.width / 3
drawCircle(Color.LightGray, radius = radius, center = Offset(cx, cy))
}
|
这下我们就画了一个圆。
既然主题是团团圆圆,那么能不能让它像熊猫团团和圆圆那样可以扒拉呢?
当然可以,但是就不能用drawCircle来画了。果然,Compose的Canvas也提供了一个drawPath方法。
PS: 或许可以通过Matrix来处理变形?不过作为初学者还是先不搞了。
咱们就可以用drawPath来画一个多边形,只要边够多,那看起来就是一个圆。代码如下:
1
2
3
4
5
6
7
8
9
10
11
12
13
14
15
16
17
18
19
20
| @Composable
fun Moon(modifier: Modifier = Modifier) {
Canvas(modifier = modifier) {
val cx = size.width / 2
val cy = size.height / 2
val radius = size.width / 3
val path = Path()
val pointCount = 360
for (i in 0..pointCount) {
val x = (cx + sin(i * 2 * PI / pointCount) * radius).toFloat()
val y = (cy - cos(i * 2 * PI / pointCount) * radius).toFloat()
when (i) {
0 -> path.moveTo(x, y)
pointCount -> path.close()
else -> path.lineTo(x, y)
}
}
drawPath(path = path, color = Color.LightGray)
}
}
|
Preview了一下,完全就是一个圆,这里就不贴图了,省点流量。
第二步:让圆可以变形
这就需要让radius成为一个变量了,比如我们在45度位置向外扒拉,这附近的radius需要变大,而且需要“圆润”的变化。以我有限的数学知识,想到了一个多年前接触过的一个玩意儿:正态分布。
马上去百度百科去找到了这个:
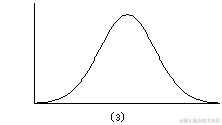
其实大学时还接触过小波之类的东西,但都忘干净了,这个正态分布曲线就将就拿来用用吧。对应的公式是:

简化一下,大概是这样用:
1
2
3
4
5
6
7
| val baseRadius = size.width / 3
val dragIndex = ...
val strength = ...
val effectCount = ...
val x = (index - dragIndex) / effectCount.toDouble()
val f = strength * Math.E.pow(-x * x)
val radius = (baseRadius + baseRadius * f).toFloat()
|
目前可以看出来,受扒拉手势影响的参数有dragIndex, strength, effectCount这三个。暂时先不管手势处理,就把这些参数写死来调试一下。
调试过程中发现,刚才的for (i in 0..pointCount)不能用,因为当dragIndex在0附近时,会出现不连续的问题,所以需要根据dragIndex动态调整fromIndex和toIndex。
1
2
3
4
5
6
7
8
9
10
11
12
13
14
15
16
17
18
19
20
21
22
23
24
25
26
27
28
| @Composable
fun Moon(modifier: Modifier = Modifier) {
Canvas(modifier = modifier) {
val cx = size.width / 2
val cy = size.height / 2
val baseRadius = size.width / 3
val path = Path()
val pointCount = 360
val dragIndex = 100
val effectCount = pointCount / 8
val fromIndex = dragIndex - pointCount / 2
val toIndex = fromIndex + pointCount
for (i in fromIndex..toIndex) {
val strength = 0.4f
val x0 = (i - dragIndex) / effectCount.toDouble()
val p = strength * Math.E.pow(-x0 * x0)
val radius = (baseRadius + baseRadius * p).toFloat()
val x = (cx + sin(i * 2 * PI / pointCount) * radius).toFloat()
val y = (cy - cos(i * 2 * PI / pointCount) * radius).toFloat()
when (i) {
fromIndex -> path.moveTo(x, y)
toIndex -> path.close()
else -> path.lineTo(x, y)
}
}
drawPath(path = path, color = Color.LightGray)
}
}
|
看下效果,将个烂就吧:
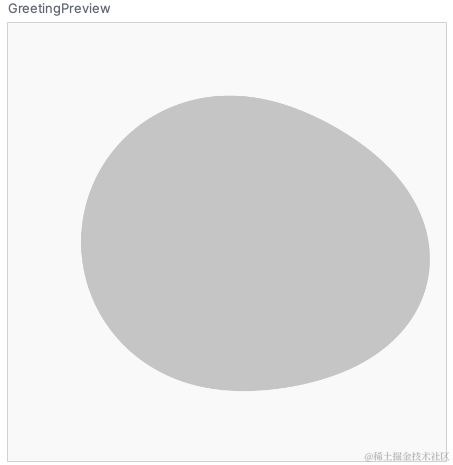
第三步: 添加扒拉手势
先定义一个扒拉实体类:
1
2
3
4
| data class Drag(
val strength: Float = 0f,
val index: Int = 0
)
|
为了减少干扰,就没有把effectCount也加到这个类里面,况且effectCount应该和strength是相关的。
让Drag作为Moon()的参数:
1
2
3
4
5
6
7
8
9
10
11
12
13
14
| @Composable
fun Moon(drag: Drag, modifier: Modifier = Modifier) {
Canvas(modifier = modifier) {
...
val effectCount = if (drag.strength < 0) {
pointCount / 8
} else {
pointCount / 12
}
val dragIndex = drag.index
val strength = drag.strength
...
}
}
|
为了添加扒拉手势,需要用到Modifier.pointerInput了。为了方便Preview,就再在Moon()外面套一个DragMoon()来管理Drag得了:
1
2
3
4
5
6
7
8
9
10
11
12
13
14
15
16
17
18
19
20
21
22
23
24
25
26
27
28
29
30
31
32
33
34
35
36
37
38
39
| @Composable
fun DragMoon(modifier: Modifier) {
val drag = remember {
mutableStateOf(Drag())
}
val startOffset = remember {
mutableStateOf(Offset(0f, 0f))
}
val modifierState = remember {
mutableStateOf(modifier.pointerInput(Any()) {
detectDragGestures(
onDragStart = {
startOffset.value = it
},
onDrag = { change, dragAmount ->
val relateStart = startOffset.value.copy(
startOffset.value.x - size.width / 2,
startOffset.value.y - size.height / 2
)
val relate = change.position.copy(
change.position.x - size.width / 2,
change.position.y - size.height / 2
)
val index = 90 + (atan2(relate.y, relate.x) / (2 * PI / 360)).toInt()
drag.value = Drag(
strength = (relate.getDistance() - relateStart.getDistance()) / 500f,
index = index
)
}
)
})
}
Moon(drag = drag.value, modifierState.value)
}
|
这里需要用到remember这个方法,它的作用我就不展开讲了(主要是没能力讲),大概就相当于给View设置了一个属性,修改属性可以触发View刷新自己。
第四步:添加回弹动画
和上一步一样,添加一个remember属性endAnimator。
1
2
3
4
5
6
7
8
9
10
11
12
13
14
15
16
17
18
19
20
21
22
23
24
25
26
27
28
| @Composable
fun DragMoon(modifier: Modifier) {
...
val endAnimator = remember {
mutableStateOf(ValueAnimator.ofFloat(0f, 1f))
}
val modifierState = remember {
mutableStateOf(modifier.pointerInput(Any()) {
detectDragGestures(
...
onDragEnd = {
endAnimator.value = ValueAnimator.ofFloat(drag.value.strength, 0f).apply {
interpolator = BounceInterpolator()
duration = 500
addUpdateListener {
drag.value = drag.value.copy(
strength = it.animatedValue as Float
)
}
start()
}
},
...
)
})
}
Moon(drag = drag.value, modifierState.value)
}
|
通过一个Animator,让drag.strength动态变为0,并刷新Moon()就行了。
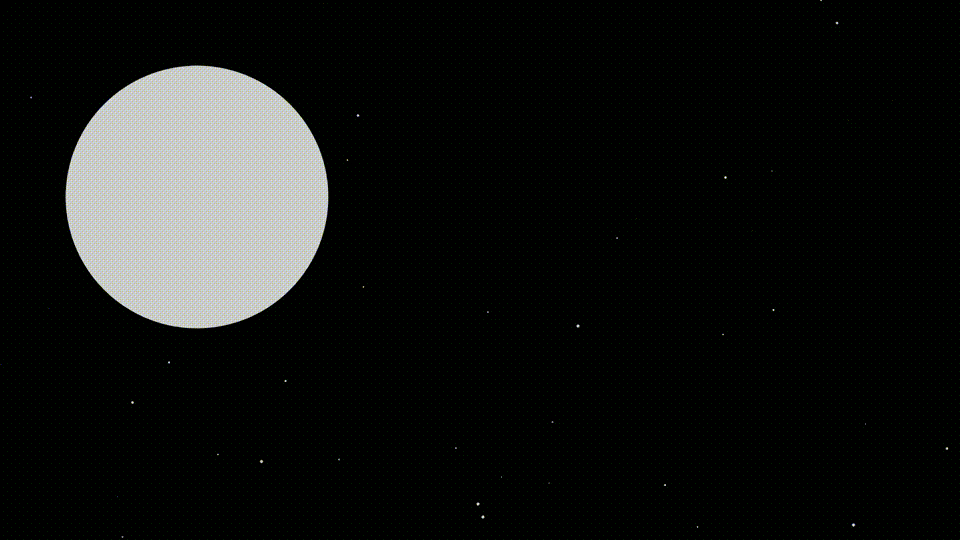
第五步:星空
首先需要让整个手机屏幕全黑,并隐藏状态栏。修改一下Theme就行了:
1
| <style name="Theme.ComposeMoon" parent="android:Theme.Material.Light.NoActionBar.Fullscreen" />
|
1
2
3
4
5
6
7
8
9
10
11
12
13
14
15
16
17
18
19
20
21
22
23
| @Composable
fun ComposeMoonTheme(
darkTheme: Boolean = true,
content: @Composable () -> Unit
) {
val colorScheme = DarkColorScheme.copy(
background = Color.Black
)
val view = LocalView.current
if (!view.isInEditMode) {
SideEffect {
val window = (view.context as Activity).window
window.statusBarColor = Color.Transparent.toArgb()
WindowCompat.getInsetsController(window, view).isAppearanceLightStatusBars = darkTheme
}
}
MaterialTheme(
colorScheme = colorScheme,
typography = Typography,
content = content,
)
}
|
然后需要在星空中画一些星星。刚才在画月亮时就已经现学现卖了Canvas、remember相关的知识,现在画星星就很从容了:
1
2
3
4
5
6
7
8
9
10
11
12
13
14
15
16
17
18
19
20
21
22
23
24
25
26
27
28
29
30
| @Composable
fun Starry(modifier: Modifier) {
val drew = remember {
mutableStateOf(listOf<Star>())
}
Canvas(modifier = modifier) {
if (drew.value.isEmpty()) {
val count = 40
(0..count).map {
val x = (0..size.width.toInt()).random()
val y = (0..size.height.toInt()).random()
val size = (1..6).random().dp
Star(
position = Offset(x.toFloat(), y.toFloat()),
size = size
)
}.apply {
drew.value = this
}
}
drew.value.forEach {
drawCircle(color = Color.LightGray, radius = it.size.value / 2, center = it.position)
}
}
}
data class Star(
val position: Offset,
val size: Dp
)
|
最后贴一下源码,杀割!